
 My wife’s Father’s Day present to me was a helping hand all day on Sunday with my first engine pull. The weather couldn’t have been better. We took off all the fuel injection wiring, disconnected the various hoses and labelled everything. I learned the Muir book is a major pain in the ass to go through the engine removal section. I also learned the Bentley is about as nuts and bolts as it gets. While reading it, I had no idea what it meant when it said the “upper left engine mounting bolt is pressed into the engine case to facilitate engine removal.” Twenty-five bucks later (spent on two Craftsman 17mm wrenches) and with the engine otherwise completely detached from the transmission, I realized that the cryptic note meant that there was actually no nut at that unreachable space behind the air distribution manifold pipes, but rather you had to completely unscrew the bolt from the backside. Duh. What a nightmare that was. Just getting the wrench in that tight a spot was a complete nightmare. The engine was being supported by the jack and I had already taken the jack stands off the car so that I could easily drop the engine. I crawled underneath and tried to get some room to loosen the bolt. Felt something pop in my wrist as I tried to get enough leverage to work the ratchet and started pulling on the bolt to loosen it up. Funny enough, it’s the other wrist that’s all swollen this morning (Tuesday). I know that happened during this “procedure” as well, but I don’t know how it happened.
So I finally got the bolt off. Took me about twenty minutes. After that, the engine slid out nicely and I lowered it onto the engine cart with the help of a few bricks and some crafty work with the floor jack.
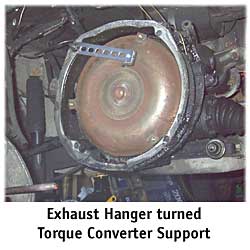
A couple more things about the automatic transmission… Russ Wolfe from the Type 3 e-mail list offered a great way to support the AT when pulling the engine, and it works great. Basically, it involves using a wire coathanger threaded through the AT bellhousing and fastened through the drain hole under the front part of the engine cover seal in the center. Once the engine is pulled, the tension on the coathanger keeps the AT from sagging. I also found out that a $2.99 tailpipe hanger kit at Auto Barn works great for a torque converter support bar. Just use the bracket with the holes in it and cut the bottom rubber piece off. I’ll post a pic soon.
 Once the engine was on the cart, I went to jack up the car’s rear end a bit so that I could slide the engine out from underneath the car. The right rear of the car was supported on a jack stand, and I was raising the driver’s side above the height of the jack stand there just temporarily. As I lifted, I heard a giant *pop*, as if a tire had blown. My first thought was that the jack had blown, but it’s a heavy-duty Craftsman jack meant for SUV’s. It also seemed to work fine afterwards. None of the tires looked like they had lost any air either. Since most of the weight had been on the front right suspension at the time I heard the pop, I thought maybe a shock blew. I haven’t checked it for leaking oil yet though, and right now I have no idea what the noise was. When I think about it though, it makes me a little nervous. I’m sure I’ll eventually find out what it was.
So Monday was spent doing all this and once the engine was out from underneath the car, my stepson helped me start taking the air intake system and cooling tin off the engine. It’s a wonder the engine didn’t completely burn up. Dirt and other debris was absolutely packed into the space between each fin of the cylinders. This is obviously one place that hadn’t been seen in a long time. I’m actually debating whether or not I should just remove the cylinders altogether and clean them at the same time I’m replacing the heads. I’ll probably post the question to the Type 3 list and see what people have to say. Part of me is thinking that while the engine is out I should just do a complete rebuild. I think I’ll wait on that though. I was surprised how easily the nuts on the exhaust connection came off. That penetrating oil sold by aircooled.net is just miracle stuff. More later.
 Rained all day yesterday, but I had to work a full day anyway. Sun was supposed to come out today, but it didn’t. Still, it didn’t rain, so I took the opportunity to do an oil and filter change on the wife’s Toyota, which we’re giving away to her niece on Monday, and did the same to my Jetta, which was at 5000 miles since the last one. Decided to use semi-synthetic instead of pure synth this time. Added a pint of Valvoline high-mileage additive and the car seems a bit better for it. Strange stuff. Real gooey. I have my doubts that it really does anything but thicken the viscosity of the oil. Whatever… With 123K miles, the Jetta is getting up there in age, so I’m at the point where I’m not worried about trying these “restorative” additives that are probably doing more to my wallet than my car.
 Took the underplate off the master cylinder and what a mess. Both the plate and the MC are just covered in rust. I took the plate home to POR-15 it and the master cylinder will be replaced. I might try to get it rebuilt at a later date. I initially thought it was dry, but when I started loosening one of the brake line fittings, brake fluid started oozing out. I guess this is a good sign as it means there is probably little if any rust in the lines and maybe the brake cylinders are still good as well.
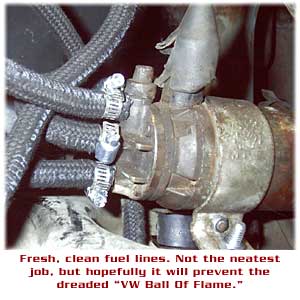
 Got a much better look on Saturday at what’s going to be involved in pulling the engine. I jacked up the rear of the car and just took about fifteen minutes to get underneath and really just look around and see what was what underneath. I think it’s probably not going to be as difficult as I thought, or at the very least it won’t be as complicated. I just have to make sure every connection is labelled properly and that the transmission will be supported when I drop the engine. I’m still amazed at how solid this car seems. Even above the transmission there’s no rust. I did find the recirc canister above the transmission and figure it will be included in all the hoses I want to replace. I just ordered some more fuel line from a guy on Ebay so I can finish up the fuel line replacement. I had no idea how much braided line I’d need. So far I’m at about ten feet and I’m almost done. Another six feet should do it. Most of the recent batch went to the part of the fuel ring that goes over the engine cross-wise. I took out the old fuel line from inside the plastic tubing. Most of it was in good shape, but I figured it would be best not to re-use it.
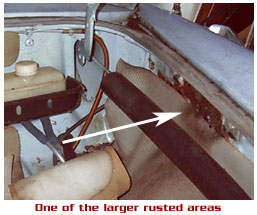 Cleaned up the plastic tubing and then threaded the new fuel line into it. Left it off the engine though as I figure I’ll do the rest of the engine compartment when I put the engine back in after I replace the heads. I had no idea how open the torque converter was to the elements, but I guess it doesn’t matter. There’s a huge spot on the driver’s side that I guess will be the place that I can disconnect the torque converter from the engine’s drive plate. My schedule is booked up for the next weekend, but hopefully the 24th and 25th of May will be nice days so I can hopefully get this done. I figure if I start around 8am I should be able to change the heads in one day. With most of the other stuff done — ignition replaced, fuel lines replaced, vacuum lines replaced — I’m hoping once the heads are changed all I’ll have to do to get her running is a valve adjustment & timing set. It would be way cool to have this thing on the road for June, but I have no idea how long the brakes will take me to get working. While I was under the car I took one of the rear brake plugs off the backing plate & there seemed to be a lot of brake pad left. In fact, they seemed almost new. However, I have no idea in what condition the cylinders are, and I’m planning on totally replacing the master cylinder. I already bought the blue brake hose, so I’m going to replace that as well. The hose on there now seems pretty dried up and old. While I was checking that, I got a glimpse at what I think rusted out the section under the hood on the driver’s side just in front of the antenna. It looks like water got trapped up behind the other fuel canister that sits in the fender, and it must’ve rusted right through. There’s a lot of dirt in there, so I wouldn’t be surprised if it just held in all that moisture and gave the rust a good place to take hold. Bad design I guess. Someday I’ll get to replace that… Someday.